Using GitHub Actions to Build and Deploy Cloudflare Pages

At the time of writing, Cloudflare Pages Admin Console doesn't support publishing the same GitHub Repo to multiple domain. This article will explain how to do that with help of GitHub Actions.
I'm a big fan for usng Markdown for content creation and use a server side generator to generate static pages for documentations or project. Then we use Cloudflare Pages to host the generated pages. This make access fast and simple.
However, we face the issue which Cloudflare Pages admin console does not support multiple domain in same project yet and it's very common to use branches in same Repo to differentiate different environment and hence the need for different URL.
Preparations
First thing we need is to get the API token and account ID. You can do that by following the steps listed here.
You also need the Account ID which can be accessed from your domain's dashboard.
GitHub Secrets
GitHub Secrets is a place which GitHub allow administrator to store sensitive info outside of the GitHub Actions definition file. All values stored there can be retrieved by GitHub Actions to use during the executions.
The GitHub Secrets is located in this place in your GitHub Repo. Make sure you do Repo level Secrets so the Secrets is not shared with other Repo.
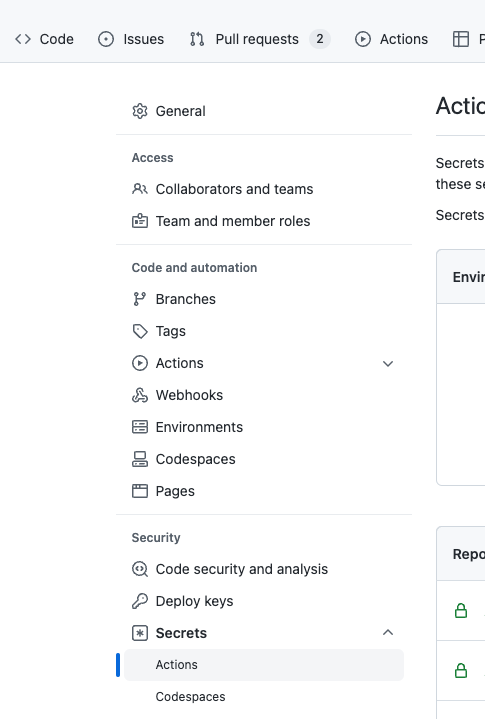
Just click New Repository Secrets button at top and give it a name. Remember the name as we will use it in the GitHub Actions scripts later.
Note that you can only input values to GitHub Repo Secrets but you cannot retrieve the value back. Do make sure you put right value as you cannot verify
GitHub Actions
Now all you need to do is to create a GitHub Actions file (YML file) and put in the .github/workflows folder. You can name it anything you like.
name: Cloudflare Deployment
on:
push:
branches: [ "stable" ]
pull_request:
branches: [ "stable" ]
workflow_dispatch:
jobs:
deploy:
permissions:
contents: read
deployments: write
runs-on: ubuntu-latest
strategy:
matrix:
node-version: [16]
steps:
- uses: actions/checkout@v3
- name: Use Node.js ${{ matrix.node-version }}
uses: actions/setup-node@v3
with:
node-version: ${{ matrix.node-version }}
- run: npm i
- run: npm run build --if-present
- name: Publish To production
with:
apiToken: ${{ secrets.CF_API_TOKEN }}
accountId: ${{ secrets.CF_ACCOUNT_ID }}
command: pages publish "./dist" --project-name=app1 --branch=main
A few highlight to the workflow file:
- We leverage a GitHub Actions created by Cloudflare which is at this Repo
- The steps executed by GitHub Actions are
- npm i - install the needed npm packages
- npm run build - to build the packages and generate the static files
- pages publish - to upload the generated files to Cloudflare Pages project
You can configure the GitHub Actions to trigger based on different conditions. The sample file included above is based on any push and PR and it will trigger the GitHub Actions to build and upload the generated files to Cloudflare Pages.
There are some other options can specify for pages publish command to control which branch (i.e. preview or main build in Cloudflare Pages) and name of the project (i.e. container used in Cloudflare Pages for hosting generated files).
Putting Together
Once everything setup. New build version will be uploaded to Cloudflare Pages and you can configure the pages to use your custom domains according to your needs.
